


一、基础配置
核心层主要涉及到如下配置内容:
1.1 串口连接交换机
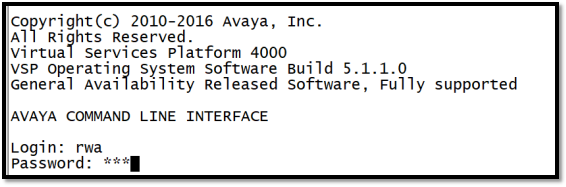
通过Console线连到交换机的Console口(如图一)
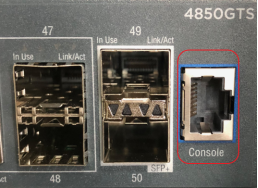
图一
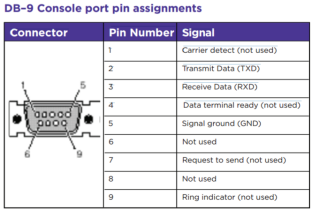
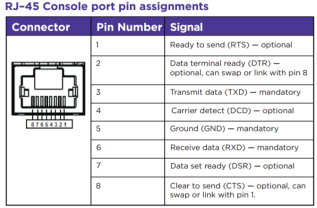
如果没有串口线,可以按如下线序制作串口线。
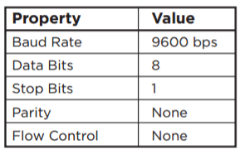
打开SecureCRT或者其他超级终端, 并按下图配置串口参数
1.2 默认用户名密码
系统默认有如下用户名密码,常用的用户名为:rwa 默认的密码为:rwa
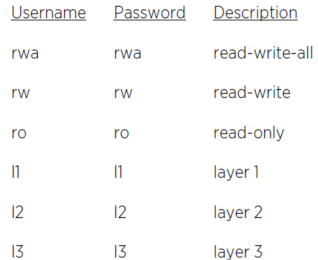
样例:

1.3 密码变更
VSP4K-D5:1(config)#cli password rwa ?
layer1 Change layer1 read write login/password
layer2 Change layer2 read write login/password
layer3 Change layer3 read write login/password
read-only Change read only login/password
read-write Change read write login/password
read-write-all Change read write all login/password
VSP4K-D5:1(config)#cli password rwa read-write-all
Enter the old password : ***
Enter the New password : ***
Re-enter the New password : ***
Password changed successfully
VSP4K-D5:1(config)#CP1 [01/01/70 03:19:48.694] 0x00000021 00000000 GlobalRouter SW INFO Password modified for user access level RWA
增加一个用户:
Switch:1>enable
Switch:1#configure terminal
Switch:1(config)#username add smith level rwa enable
Enter password : *******
Re-enter password : *******
Switch:1(config)#
开启web配置界面,默认用户名/密码:admin/password
Switch:1>enable
Switch:1#configure terminal
Switch:1(config)#web-server enable
Switch:1(config)#web-server secure-only
Switch:1(config)#web-server read-only-user enable
Switch:1(config)#web-server password ro jones6 G69s8672
SSwitch:1(config)#web-server password rwa smith2 90Go2437
Switch:1(config)#show web-server
1.4 进入全局模式
在普通模式(>提示符)下,输入enable进入全局模式,如下图

1.5 查看交换机信息
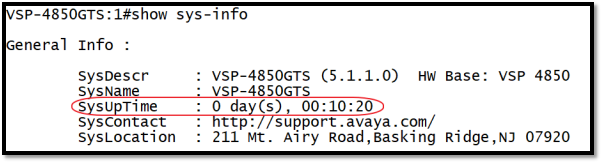
在配置模式下,输入show sys-info可以查询交换机的如下信息:
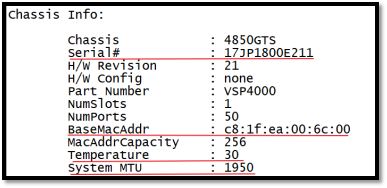
A. 运行时间
B. 机器序列号/主机MAC(用于许可激活)/机器温度/MTU值
C. 电源/风扇状态,电源序列号
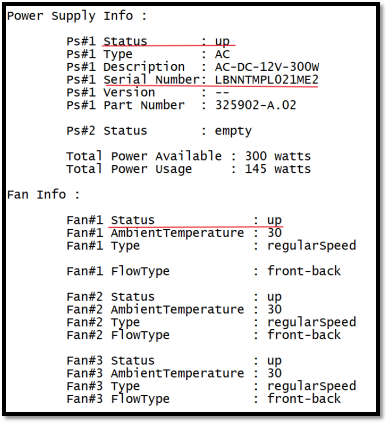
D. 如下为show sys-info的全信息样例
VSP-4850GTS:1#show sys-info
General Info :
SysDescr : VSP-4850GTS (5.1.1.0) HW Base: VSP 4850 SysName : VSP-4850GTS SysUpTime : 0 day(s), 00:10:20 SysContact : http://support.avaya.com/ SysLocation : 211 Mt. Airy Road,Basking Ridge,NJ 07920
Chassis Info:
Chassis : 4850GTS Serial# : 17JP1800E211 H/W Revision : 21 H/W Config : none Part Number : VSP4000 NumSlots : 1 NumPorts : 50 BaseMacAddr : c8:1f:ea:00:6c:00 MacAddrCapacity : 256 Temperature : 30 System MTU : 1950
Card Info :
Slot# CardType Serial# Part# Oper Admin Power Status Status State 1 4850GTS 17JP1800E211 21 up up on
Power Supply Info :
Ps#1 Status : up Ps#1 Type : AC Ps#1 Description : AC-DC-12V-300W Ps#1 Serial Number: LBNNTMPL021ME2 Ps#1 Version : -- Ps#1 Part Number : 325902-A.02
Ps#2 Status : empty
Total Power Available : 300 watts Total Power Usage : 145 watts
Fan Info :
Fan#1 Status : up Fan#1 AmbientTemperature : 30 Fan#1 Type : regularSpeed
Fan#1 FlowType : front-back
Fan#2 Status : up Fan#2 AmbientTemperature : 30 Fan#2 Type : regularSpeed Fan#2 FlowType : front-back
Fan#3 Status : up Fan#3 AmbientTemperature : 30 Fan#3 Type : regularSpeed Fan#3 FlowType : front-back
LED Info :
LED#1 Label : PWR LED#1 Status : GreenSteady
LED#2 Label : Status LED#2 Status : GreenSteady
LED#3 Label : Rps LED#3 Status : Off
LED#4 Label : Up
LED#4 Status : UnSupported
LED#5 Label : Down LED#5 Status : UnSupported
LED#6 Label : Base LED#6 Status : UnSupported
USB Info :
Vendor Id : 196d Manufacturer : InnoDisk Product Id : 0201 Product Name : Nano Rev : 02.50 Serial Number : 17C01I000304 Max Current : 500 mA
System Error Info :
Send Login Success Trap : false Send Authentication Trap : false Error Code : 0
Error Severity : 0
Port Lock Info :
Status : off LockedPorts :
Message Control Info :
Action : suppress-msg Control-Interval : 5 Max-msg-num : 5 Status : disable
Configuration Operation Info Since Boot Up: Last Change: 0 day(s), 00:00:00 Last Vlan Change: 0 day(s), 00:00:00 Last Statistic Reset: 0 day(s), 00:00:00
Current Uboot Info : ----------------------------------------------------------------------------------------------------
VU-Boot 2012.04 (Feb 17 2016 - 10:34:26)MPC83XX |
1.6 进入配置模式
当需要对交换机进行基础配置时,需要首先进入全局配置模式,进入的方式如下:
在全局模式下输入: config terminal 或 config t

1.7 更改主机名
switch(config)# snmp-server name “name”

1.8 激活端口
VSP系列交换机在
出厂配置状态下,所有端口为shudown状态,需要通过如下命令手动启用。
no shutdown
BEB-1:1(config)#interface gigabitEthernet 1/13 BEB-1:1(config-if)#no shutdown BEB-1:1(config-if)# CP1 [01/01/70 00:44:54.050:UTC] 0x0000c5ec 00300001.204 DYNAMIC CLEAR GlobalRouter HW INFO Link Up(1/13) CP1 [01/01/70 00:44:55.268:UTC] 0x0000c5e7 00300001.204 DYNAMIC SET GlobalRouter HW INFO Link Down(1/13) CP1 [01/01/70 00:44:58.195:UTC] 0x0000c5ec 00300001.204 DYNAMIC CLEAR GlobalRouter HW INFO Link Up(1/13) |
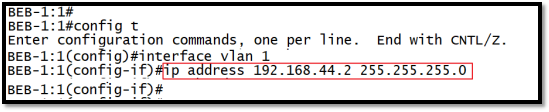
1.9 设置管理地址
新的交换机默认只有一个VLAN,即VLAN 1,如果需要配置管理地址,需要根据管理VLAN的规划,进入的相对应的VLAN接口下,通过如下命令配置管理地址:
ip address 192.168.10.254 255.255.255.0
对于有带外管理以太网端口的交换机,可以设置管理端口的IP地址:
interface mgmtEthernet <mgmt | mgmt2>
ip address {<A.B.C.D/X> | <A.B.C.D> <A.B.C.D>}
show interface mgmtEthernet
1.10 开启telnet, ssh, tftp
vsp4ka1:1(config)#boot config flags ?
...
ftpd Enable ftp server
...
sshd Enable ssh daemon
telnetd Enable telnet server
tftpd Enable tftp server
...
vsp4ka1:1(config)#boot config flags ftpd
vsp4ka1:1(config)#boot config flags tftpd
vsp4ka1:1(config)#save config
1.11 升级交换机
在交换机配置上前前,务必要将交换机升级到最新的稳定版本。升级方式可以有如下几种方式:
1.11.1 FTP升级
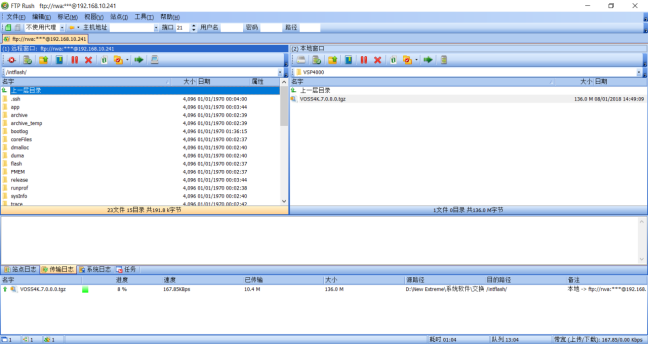
VOSS的image比较大,基本上在60-100Mb左右大小,建议采用FTP方式升级。升级步骤如下:
BEB-1:1>en BEB-1:1#config t BEB-1:1(config)#boot config flag ftpd
|
BEB-1:1(config)#show software
============================================================== software releases in /intflash/release/
============================================================== VOSS4K.5.1.1.0.GA (Primary Release)
---------------------------------------------------------------------------------------------------- Auto Commit : enabled Commit Timeout : 10 minutes
BEB-1:1(config)#software add VOSS4K.7.0.0.0.tgz Extracting distribution information from /intflash/VOSS4K.7.0.0.0.tgz Extracting software version VOSS4K.7.0.0.0.GA from /intflash/VOSS4K.7.0.0.0.tgz Extraction of VOSS4K.7.0.0.0.GA to /intflash/release/VOSS4K.7.0.0.0.GA successful Setting permissions on /intflash/release/VOSS4K.7.0.0.0.GA successful BEB-1:1(config)# BEB-1:1(config)#software activate VOSS4K.7.0.0.0.GA Executing software activate for version VOSS4K.7.0.0.0.GA. Validating release VOSS4K.7.0.0.0.GA [01/01/70 01:45:49] Sending upgrade message to slots: 1. Version=VOSS4K.7.0.0.0.GA
[01/01/70 01:45:49] Slot 1 : IMAGE SYNC: Running pre-install script for image version VOSS4K.7.0.0.0.GA [01/01/70 01:45:49] Slot 1 : IMAGE SYNC: Kernel image is being updated... [01/01/70 01:45:53] Slot 1 : IMAGE SYNC: Root_FS image is being updated... [01/01/70 01:45:57] Slot 1 : IMAGE SYNC: APP_FS image is being updated... [01/01/70 01:46:09] Slot 1 : IMAGE SYNC: Running post-install script for image version VOSS4K.7.0.0.0.GA [01/01/70 01:46:09] Slot 1 : IMAGE SYNC: Backup image successfully upgraded to VOSS4K.7.0.0.0.GA
Primary Version: VOSS4K.7.0.0.0.GA Backup Version: VOSS4K.5.1.1.0.GA
Changes will take effect on next reboot. BEB-1:1(config)#
BEB-1:1(config)#show software
============================================================= software releases in /intflash/release/
============================================================= VOSS4K.5.1.1.0.GA (Primary Release) VOSS4K.7.0.0.0.GA (Next Boot Release)
---------------------------------------------------------------------------------------------------- Auto Commit : enabled Commit Timeout : 10 minutes
BEB-1:1(config)#reset Are you sure you want to reset the switch (y/n) ? y CP1 [01/01/70 01:34:56.593:UTC] 0x0027458a 00000000 GlobalRouter SW INFO Chassis reset initiated from CLI CP1 [01/01/70 01:34:56.594:UTC] 0x0027458d 00000000 GlobalRouter SW INFO Resetting Chassis CP1 [01/01/70 01:34:58.000] LifeCycle: INFO: Stopping all processes CP1 [01/01/70 01:35:00.000] LifeCycle: INFO: All child processes have stopped CP1 [01/01/70 01:35:00.000] LifeCycle: INFO: All processes have stopped CP1 [01/01/70 01:35:00.000] LifeCycle: INFO: Flushing buffers ...CP1 [01/01/70 01:35:01.000] LifeCycle: INFO: Waiting for reset signal OK CP1 [01/01/70 01:35:02.000] LifeCycle: INFO: Restarting module INIT: Sending processes the TERM signal Stopping OpenBSD Secure Shell server: sshdstopped /usr/sbin/sshd (pid 1977) . Stopping vsp...
BEB-1:1>show software
============================================================== software releases in /intflash/release/ ============================================================== VOSS4K.5.1.1.0.GA (Backup Release) VOSS4K.7.0.0.0.GA (Primary Release)
---------------------------------------------------------------------------------------------------- Auto Commit : enabled Commit Timeout : 10 minutes
Remaining time until software auto-commit is 1 minute 38 seconds
============================================================== Software releases in /intflash/app/chef ============================================================= ---------------------------------------------------------------------------------------------------- BEB-1:1> |
VSP-4850GTS:1(config)#software remove VOSS4K.5.1.1.0.GA Executing software remove for version VOSS4K.5.1.1.0.GA. |
1.11.2 TFTP升级
BEB-1:1>en BEB-1:1#config t BEB-1:1(config)# copy 192.168.44.44:VOSS4K.7.0.0.0.tgz /intflash/
|
1.12 配置时钟
1.12.1 配置本地时钟
使用如下命令配置时钟
clock set <MMddyyyyhhmmss>
BEB-1:1#clock set 06132018133411
Clock time has been set successfully
BEB-1:1# |
1.12.2 配置NTP
ntp server < IPv4 Address> enable
BEB-1:1#config t BEB-1:1(config)#ntp server 192.168.44.44 enable |
1.13 Syslog
1.13.1 查看日志状态
BEB-1:1#show logging config Logging : Enabled clear : N/A level : 0 screen : on write : N/A |
1.13.2 查看日志
BEB-1:1#show logging file ? alarm Display alarm log entries CPU CPU detail Detail event-code Event Code module Module name-of-file Log file to display save-to-file Filename severity Severity tail Show file from tail vrf VRF Name | Apply pipe filter <cr>
BEB-1:1#show logging file tail CP1 [06/13/18 13:34:11.000:UTC] 0x0003064a 00000000 GlobalRouter SW INFO Clock set successfully.New time:Wed Jun 13 13:34:11 2018 UTC,Prev time:Thu Jan 01 02:03:20 1970 UTC,Initiated by Local Console, user: rwa from ip: --- CP1 [01/01/70 01:59:48.713:UTC] 0x00260506 00000000 GlobalRouter SW INFO Auto-committing release VOSS4K.7.0.0.0.GA
|
1.13.3 配置日志服务器
因为保存在交换机本地的log条目有限,当过多log记录时,一些超出容量的老的log会丢失。所以如果需要永久保存所有log日志,建议在网内安装syslog服务器,然后在交换机上采用以下命令来启用log上传到服务器保存的功能。假设以远端syslog服务器是1.1.1.1为例:
BEB-1:1:>enable BEB-1:1:#configure terminal BEB-1:1:(config)#syslog enable BEB-1:1:(config)#syslog host 1 BEB-1:1:(config)#syslog host 1address 10.10.10.10 BEB-1:1:(config)#syslog host 1enable BEB-1:1:(config)#syslog host 1facility local7 BEB-1:1:(config)#syslog host1udp-port 514 |
1.14 SNMP
1.14.1 查看SNMP配置
BEB-1:1#show snmp-server community
=========================================================== Community Table =========================================================== Index Name Security Name Context Name Transport Tag ----------------------------------------------------------------------------------------------- first ******** readview second ******** initialview
2 out of 2 Total entries displayed --------------------------------------------------------------------------------
BEB-1:1# |
1.14.2 SNMP V2配置
系统默认提供public做为只读通信串,private做为读写通信串,如果需要新建,参照如下步骤:
配置只读通信串为extremeread,读写通信串为extremewrite网关服务器为10.10.10.10
BEB-1:1> enable BEB-1:1# Configure Terminal BEB-1:1:(config)#snmp-server host 10.10.10.10 port 161 v2 extreme BEB-1:1:(config)#snmp-server community extreme group readgrp index first secname readview BEB-1:1:(config)#snmp-server community extremewrite group v1v2grp index second secname initialview |
1.15 许可
1.15.1 查看许可
BEB-1:1(config)#show license
License Type : 1) BASE 2) PREMIER TRIAL (non-Base features)
Premier TrialPeriodRemainingDays : 59 ******************************************************** Features requiring a Premier license: - Layer 3 VSNs - MACsec - Distributed Virtual Routing(DvR) - VXLAN GATEWAY - >24 VRFs - CHEF
BEB-1:1(config)# |
1.15.2 申请许可
1. 申请许可前需要获取激活设备的MAC地址和序列号,获取方法为,登陆交换机输入如下命令:
1. enable
2. config t
3. show sys-info
§ MAC Address (00-00-00-00-00-00)
§ Serial Number
2. 登陆激活网站,执行在线激活申请。
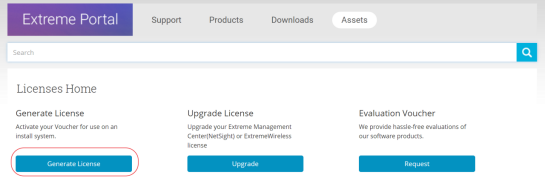
1. 打开浏览器,登陆如下网址: https://extremeportal.force.com
并输入账号信息

2. 选择Assests->Licenses Home

3. 选择‘Generate License’
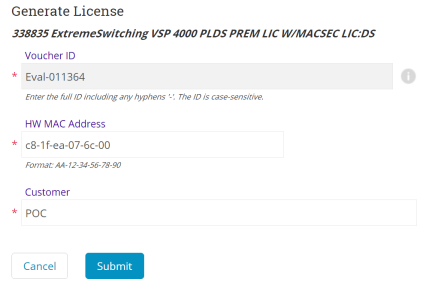
4. 输入’Voucher ID’,然后按系统提示到下一步,输入对应的MAC 地址和主机序列号,完成注册


5. 激活后,下载XML格式的许可到本地
6. 通过FTP或TFTP方式把许可下载到交换机的/intflash目录,具体下载步骤参见1.11.1或1.11.2
如下为FTP下载方式举例
C:\Users\jsmith>ftp 192.0.2.16 Connected to 192.0.2.16 (192.0.2.16). 220 FTP server ready Name (192.0.2.16:(none)): rwa 331 Password required Password: 230 User logged in ftp> bin 200 Type set to I, binary mode ftp> put L3VWithMACsec.xml /intflash/L3VWithMACsec.xml local: L3VWithMACsec.xml remote: /intflash/L3VWithMACsec.xml 227 Entering Passive Mode (192,0,2,16,4,2) 150 Opening BINARY mode data connection 226 Transfer complete 101 bytes sent in 2.7e-05 secs (3740.74 Kbytes/sec) ftp> |
1.15.3 激活许可
VSPSwitch #enable
确认许可是否存在 加载许可 Switch:1(config)#CP1 [06/12/15 15:59:57.636:UTC] 0x000005bc 00000000 GlobalRouter SW INFO License
|
1.16 Ping
BEB-1:1#ping 192.168.1.1 ? -d Set ping debug(for IPV4/IPV6) -I Interval between transmissions(for IPV4/IPV6) -s Continuous ping at interval rate(for IPV4/IPV6) -t No answer timeout value(for IPV4/IPV6) count Number of times to ping(for IPV4/IPV6) datasize Size of ping data for IPV4/IPV6 interface outgoing interface mgmt Nls mgmt scopeid Scope ID source source ip address for ping vrf Vrf <cr> |
1.17 小技巧—TAB键
TAB键的使用:如果不知道后面命令时,按TAB键,系统自动可以把后面的参数显示出来;从参数中选择你需要的参数,只需要打前面字母,用TAB可以自动补全
1.18 配置文件相关
1.18.1 查看系统运行配置
show running-config
1.18.2 查看系统运行配置(含默认隐藏配置)
show running-config verbose
1.18.3 保存配置
save config
BEB-1:1(config)#save config ? backup Backup filename file Filename verbose Save current and default configuration <cr> |
1.18.4 备份配置
BEB-1:1(config)#copy running-config 192.168.44.4:vsp4k20180613.cfg
1.18.5 交换机恢复出厂配置
可以通过以下命令来清空交换机所有配置,回到出厂状态:
BEB-1:1(config)#boot config flags factorydefaults BEB-1:1(config)#save config BEB-1:1(config)#reset Are you sure you want to reset the switch (y/n) ? |
1.18.6 系统关机
断电前建议先运行系统关机命令:
BEB-1:1(config)# sys shutdown
|
1.18.7 查看系统运行状态
可以通过以下命令来查看CPU和内存利用率:
BEB-1:1#show khi performance cpu Slot:1 Current utilization: 11 5-minute average utilization: 11 5-minute high water mark: 30 (06/13/18 18:39:31) BEB-1:1#show khi performance memory Slot:1 Used: 606460 (KB) Free: 429364 (KB) Current utilization: 58 % 5-minute average utilization: 58 % 5-minute high water mark: 58 (%) 10-minute average utilization: 56 % 1-Hour average utilization: 56 % 1-Day average utilization: 0 % 1-Month average utilization: 0 % 1-Year average utilization: 0 % |